
A lot of our customers opt for one of our standard kits, such as the Orion or Pegasus star kits, for nursery projects and achieve very satisfactory results. However, from time to time we have customers who really want to push the boat out and to achieve very high star densities.
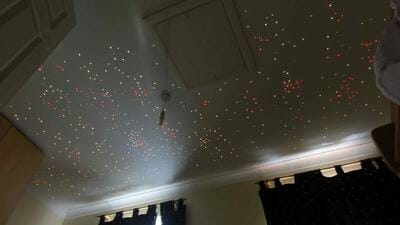
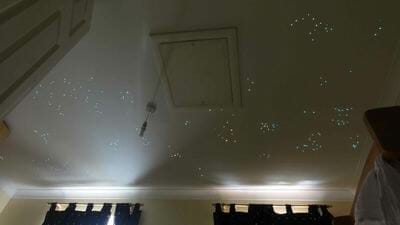
One such was Andy S who wanted to create a two-circuit, high-density star ceiling, with accurately plotted constellations illuminated by one light source and then several hundred background stars lit by another.
After some discussion we agreed a specification with Andy and made up a pair of custom fibre harnesses with 1,000 fibres in total. Some months passed, and then Andy finally came back to us to show how the project had worked out.
“I was really pleased with the outcome, but I have to admit it was a massive project,” says Andy. “Although I spent days planning, you never really know if the vision will match the finished product.”
Andy mapped out many constellations, and if you know your astronomy you should be able to identify some. “Scorpio is just behind the light pendant and Leo is there too,” he says. “I got most of the signs of the zodiac up there, apart from where the loft access is. In the video my finger is pointing at “Rigel” which is the bottom right hand corner of Orion. Thanks again for letting me know to use the “mirror image” of the constellations when drilling downwards from the loft – sound advice.”
In view of the plans which Andy had explained to us, we recommended that some 0.5mm fibres should be included in the harnesses. Normally, this very fine fibre is best left to projects in the workshop, but in this case we thought that the rewards – in terms of greater diversity in star brightness – justified the slightly increased difficulty in working with the thinner fibres.
“The different size fibres gives depth to the final piece,” agrees Andy. “When both circuits are on and the constellations colour matches the colour of the background stars, the ceiling is full of twinkling stars of all different sizes. What makes the constellations stand out is the change of colour. I decided that the higher magnitude stars should look bigger and so doubled up on the fibres too.
“The actual DIY took me a very long time! The drilling was quick (I bought a rechargeable mini drill that has a head that is at a 90 degree angle to the body) and the marking of the constellations was straight forward. The painful part was working towards the outside wall where the roof slanted (the curtains side) – very cramped, very uncomfortable – so these were the hardest constellations to map – plus the background stars that surround them.
“The second painful part was feeding 1,000 fibres through the holes! When I drilled downward through the ceiling, it wasn’t a very clean hole and so I had to pollyfill the holes around the fibres to tidy them up. The positive about the polyfilla was that this in turn held the fibres in place as operating the silicone applicator plunger in the cramped loft proved to be very difficult at full stretch. As part of the measuring up, I had to do away with a small wasps’ nest and install a nice big loft tube light (a massive help).
“Finally, clipping the fibres flush with the ceiling was actually great fun as you can start to see the project finish with every clip! For this I bought a cuticle nipper (for nails) as they are a precision tool.
“I installed a light switch from this website:http://www.retrotouch.co.uk/. I wanted something that didn’t make a traditional “click” noise when you flicked the switch (nothing like that in B & Q). The one I went for had a remote control too, as featured in the video.
“So, all in all, from rolling back the first bit of loft insulation to wiring the touch sensitive switch, maybe 40 – 50 hours with no disasters, apart from spilling some paint! Not bad for a non-DIY person like myself!
“It has really added an incredible dimension to the nursery and I finished it a month before baby arrived. Thank you for all your advice. If and when I move house, I will improve the project and go for a larger scale.”